How to use slack_transfer#
This explanation assumes that the Environmental Settings step has been completed.
See also
A notebook that can run on Google Colab is also provided:
0. Overview and definition of terms#
Using slack_transfer.run, you can transfer data from the original Slack workspace to the destination Slack workspace.
Note that if the Slack trial is still available, you can temporarily activate it to retrieve all past data.
- First, let us define the terms as follows
WS: A slack workspace.
OrG: Slack OrG, which is applicable only if you have a subscription to the Enterprise grid. In most cases, you do not need to be aware of it, but there may be a special note about WS under the Enterprise grid.
Original WS: the WS from which the data is being migrated. Since data is downloaded from this WS, it is called the download side.the WS from which the data is being migrated. Since data is downloaded from this WS, it is called the download side.
Destination WS:the destination WS.
Terminal: the terminal you set up in Environmental Settings.
If the original WS and the destination WS are switched, it will cause a major accident. Thus, in this repository, the two sides are explicitly separated, and the read/write privileges of the token are also set according to each role in order to avoid accidents.
slack_transfer run basically an all-in-one migration process.
Please be aware that, although we pay full attention, the migration process may not succeed in one shot due to the misbehavior of the slack server or potential bugs.
The following is what slack_transfer does.
┌─────────────┐                ┌────────────┐              ┌────────────────┐
│ Original WS │  --download->  │  Terminal  │  --upload->  │ Destination WS │
└─────────────┘                └────────────┘              └────────────────┘
Therefore, the terminal must have sufficient disk space to store the data of the original WS. Generally, you do not need a large amount of disk space, but you may need a large amount of space depending on the size and volume of the attached files, since attached files to the original WS will be downloaded to the terminal. If you are using a free plan of Slack, a warning will probably appear when uploading files in excess of 5 GB. If you really want to check how much space you need, please go to CLI file_volume section for a rough estimate.
This user guide assumes that you have administrative privileges on both the downloading and uploading WSs,but, not limited to.
1. Caution#
- This tool cannot give a complete migration. We are trying to migrate as much as possible, but there are some limitations due to the Slack API specifications. The following are not supported at this time:
Migration of Slack connect channel (Please ask the original Slack connect provider to re-connect)
Maintaining foldering of bookmarks (not possible due to the Slack API).
When porting Slack post, there is a possibility of formatting corruption. Post will be read-only in the destination WS. (not possible due to the Slack API limitation).
Reactions are only ported once for each type as a reaction by the API (because the API only allows the bot to press the reaction emoji).
Possible formatting errors of massages having more than 3000 characters (Due to API restrictions, the message will be split into separate submissions.)
Uploading emoji (due to API limitations, downloading is possible, but uploading is not.)
Width is limited to 50% when multiple media, such as markdown and non-text items (panels), are included (due to API limitation)
Usernames in “mention” are not converted. This is not only because it is complicated to specify user correspondence, but also because user information is automatically imported and reflected once connecting between the original and destination WS via Slack connect.
Since migrated messages are posted by the API, the timestamp is changed. Instead, the original timestamp is added at the end of the users’ name.
It is provided under the MIT license, and there is no warranty. (Only the built binary version is under the GPL3.0 license.)
Only Channel can be migrated; DM cannot.
The tool is designed to avoid destructive operation as long as possible.
- Changes that may be occurred on the original WS:
- The Slack bot will unintentionally auto-join to all public channels by itself.
When token_test is performed, the Slack bot will automatically join the default channel equivalent to “general” by itself.
- What users MUST do on the original WS:
Add a bot to the private channel that you want to migrate with this tool.
- Changes that may be occurred on the destination WS:
new channels creations, file uploads, bookmark additions, message post, pin creation, etc.
Changes performed on existing channels when the
--overrideflag is used: adding files, bookmarks, messages, changing the channel description and purpose, adding pins, etc.
- What users must do on the destination WS (=things that this tool does not do):
Delete unnecessary channels
Deleting a channel when the migration fails and trying again (using
--overrideflag is an alternative option, but it can insert data twice).make a public channel to a private channel if needed after the migration is complete
Add others to the channel as needed.
Before migrating to the production environment, it is recommended to create a test WS and confirm that the migration is successful before migrating to the production environment. If you have any problems, you can submit an issue on github ( https://github.com/masanorihirano/slack_transfer/issues ), but we do not guarantee support or bug fixes. Please be careful not to include any confidential information such as token information when submitting an issue.
2. Obtaining Slack token (the original WS)#
First, go to https://api.slack.com/apps/
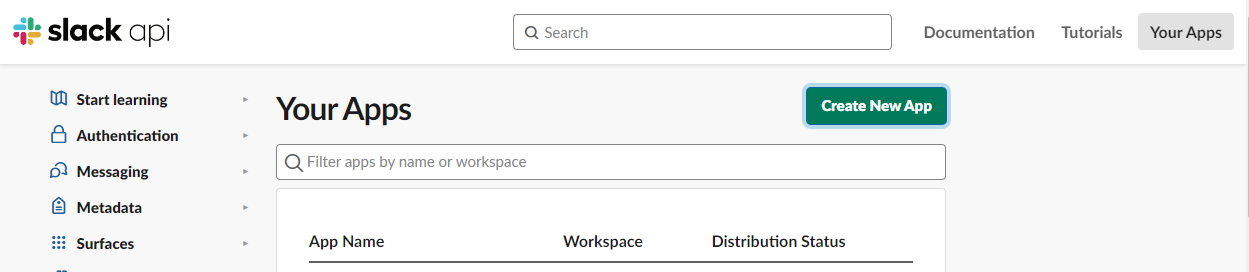
Click “Create New App”.
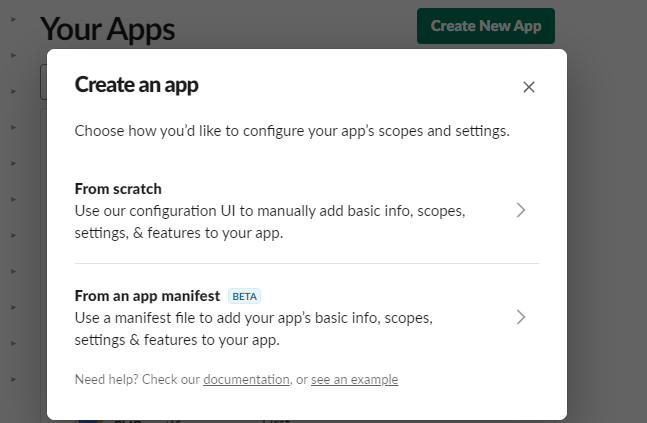
You can choose either of the two options here, but selecting “From an app manifest” is recommended because it allows you to configure all the settings at once.
Choice A: If you choose “From an app manifest”#
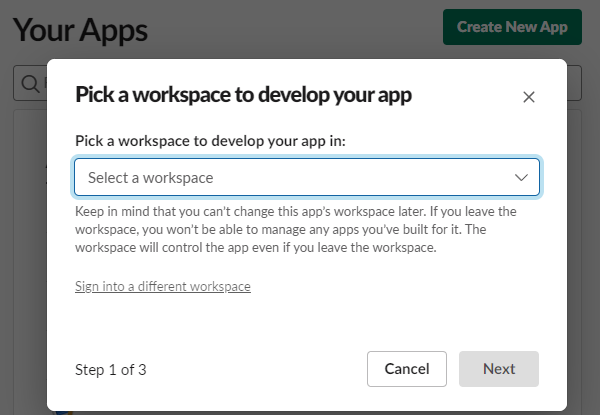
Select the original workspace from Select a workspace.

Go next,
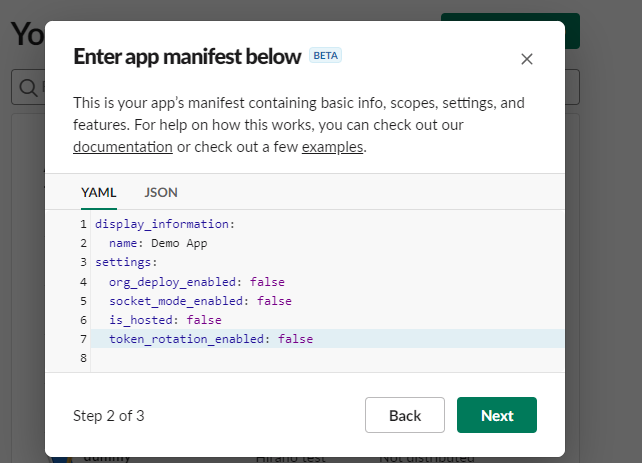
You will see a screen like this. Use the tabs in YAML and delete the code inside. Then, copy and paste the contents of here is the link to this field.
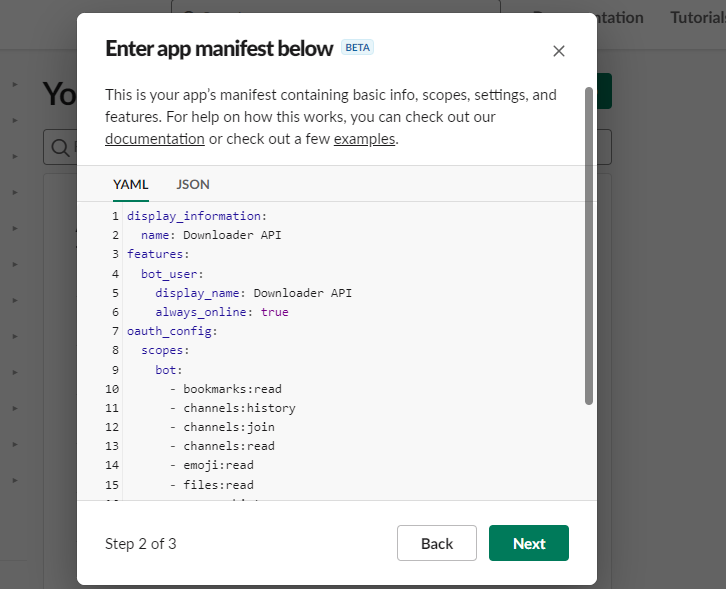
Go next,
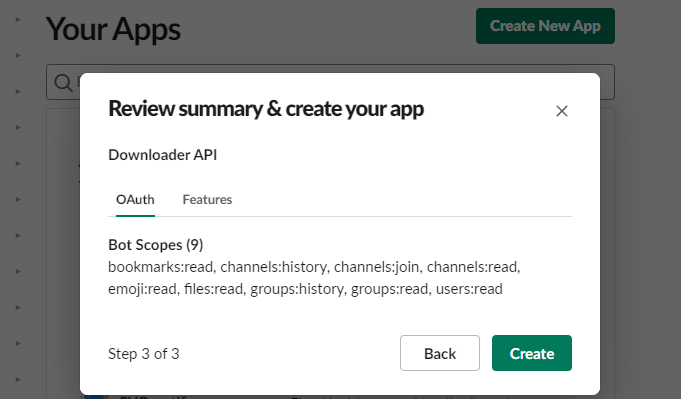
Review is requested. Also referring to Scopes required on the original WS side.
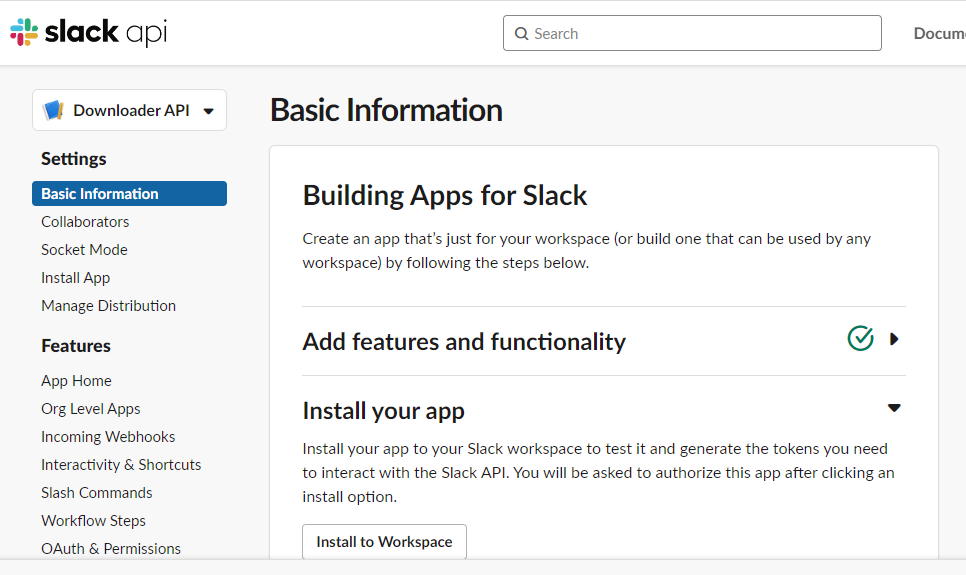
Click “Install to Workspace”.
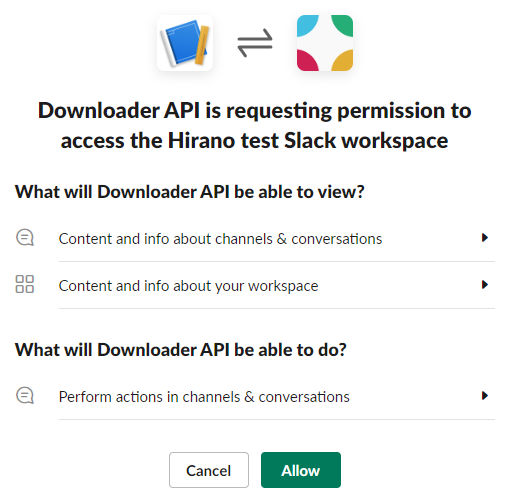
Permission is requested; so allow this
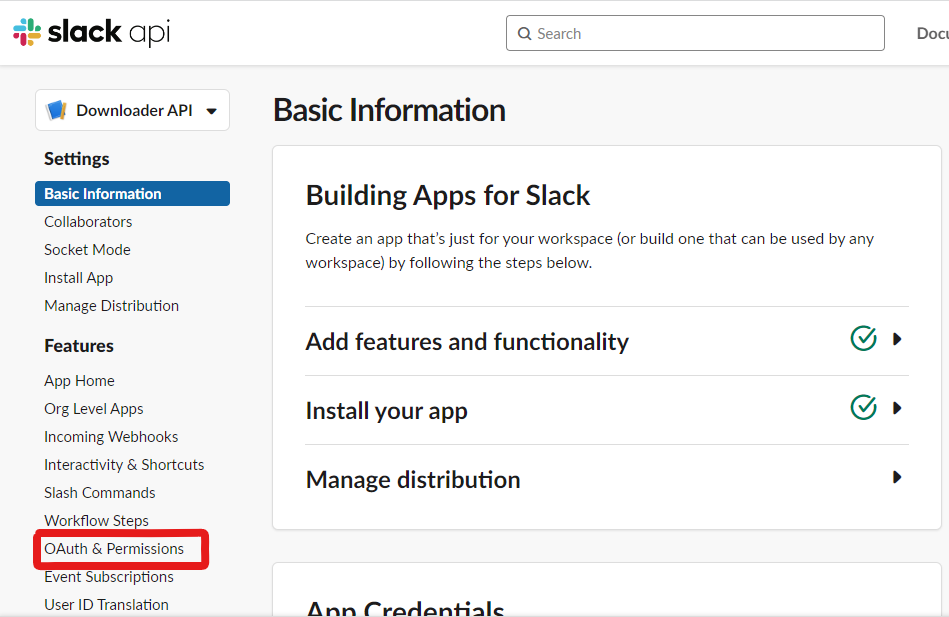
When the screen returns, click “OAuth & Permissions”.
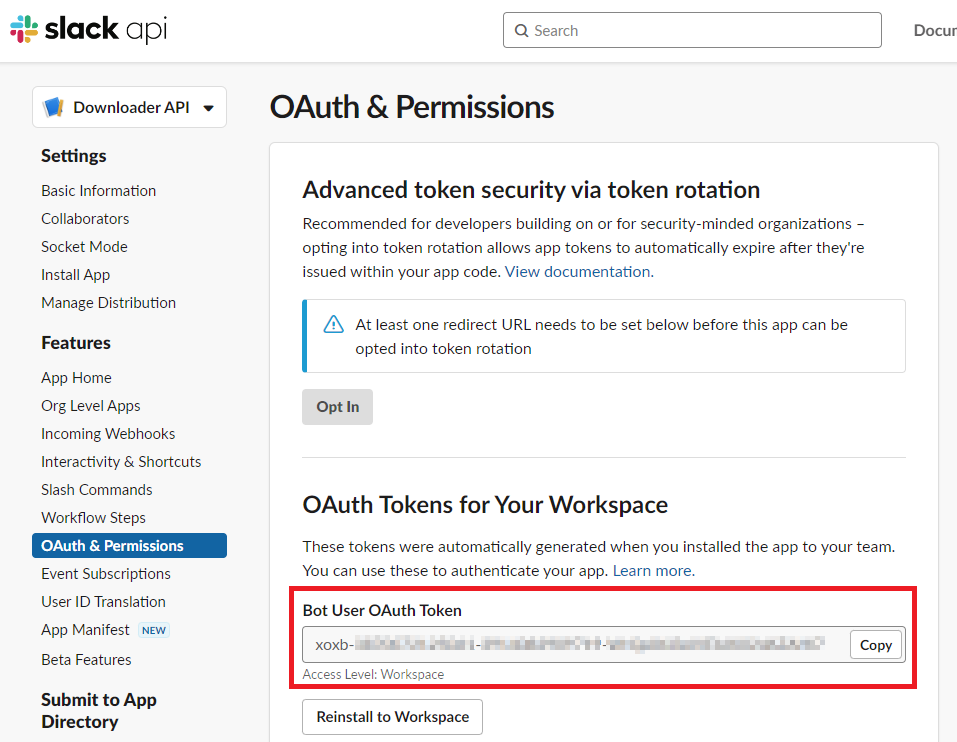
“Bot User OAuth Token” is the Token that you want this time. Make sure it starts with “xoxb-“.
Choice B: If you choose “From scratch”#
You will be asked to select the name of the API and the workspace.
Inputs, then go next,
When the screen returns, click “OAuth & Permissions”.
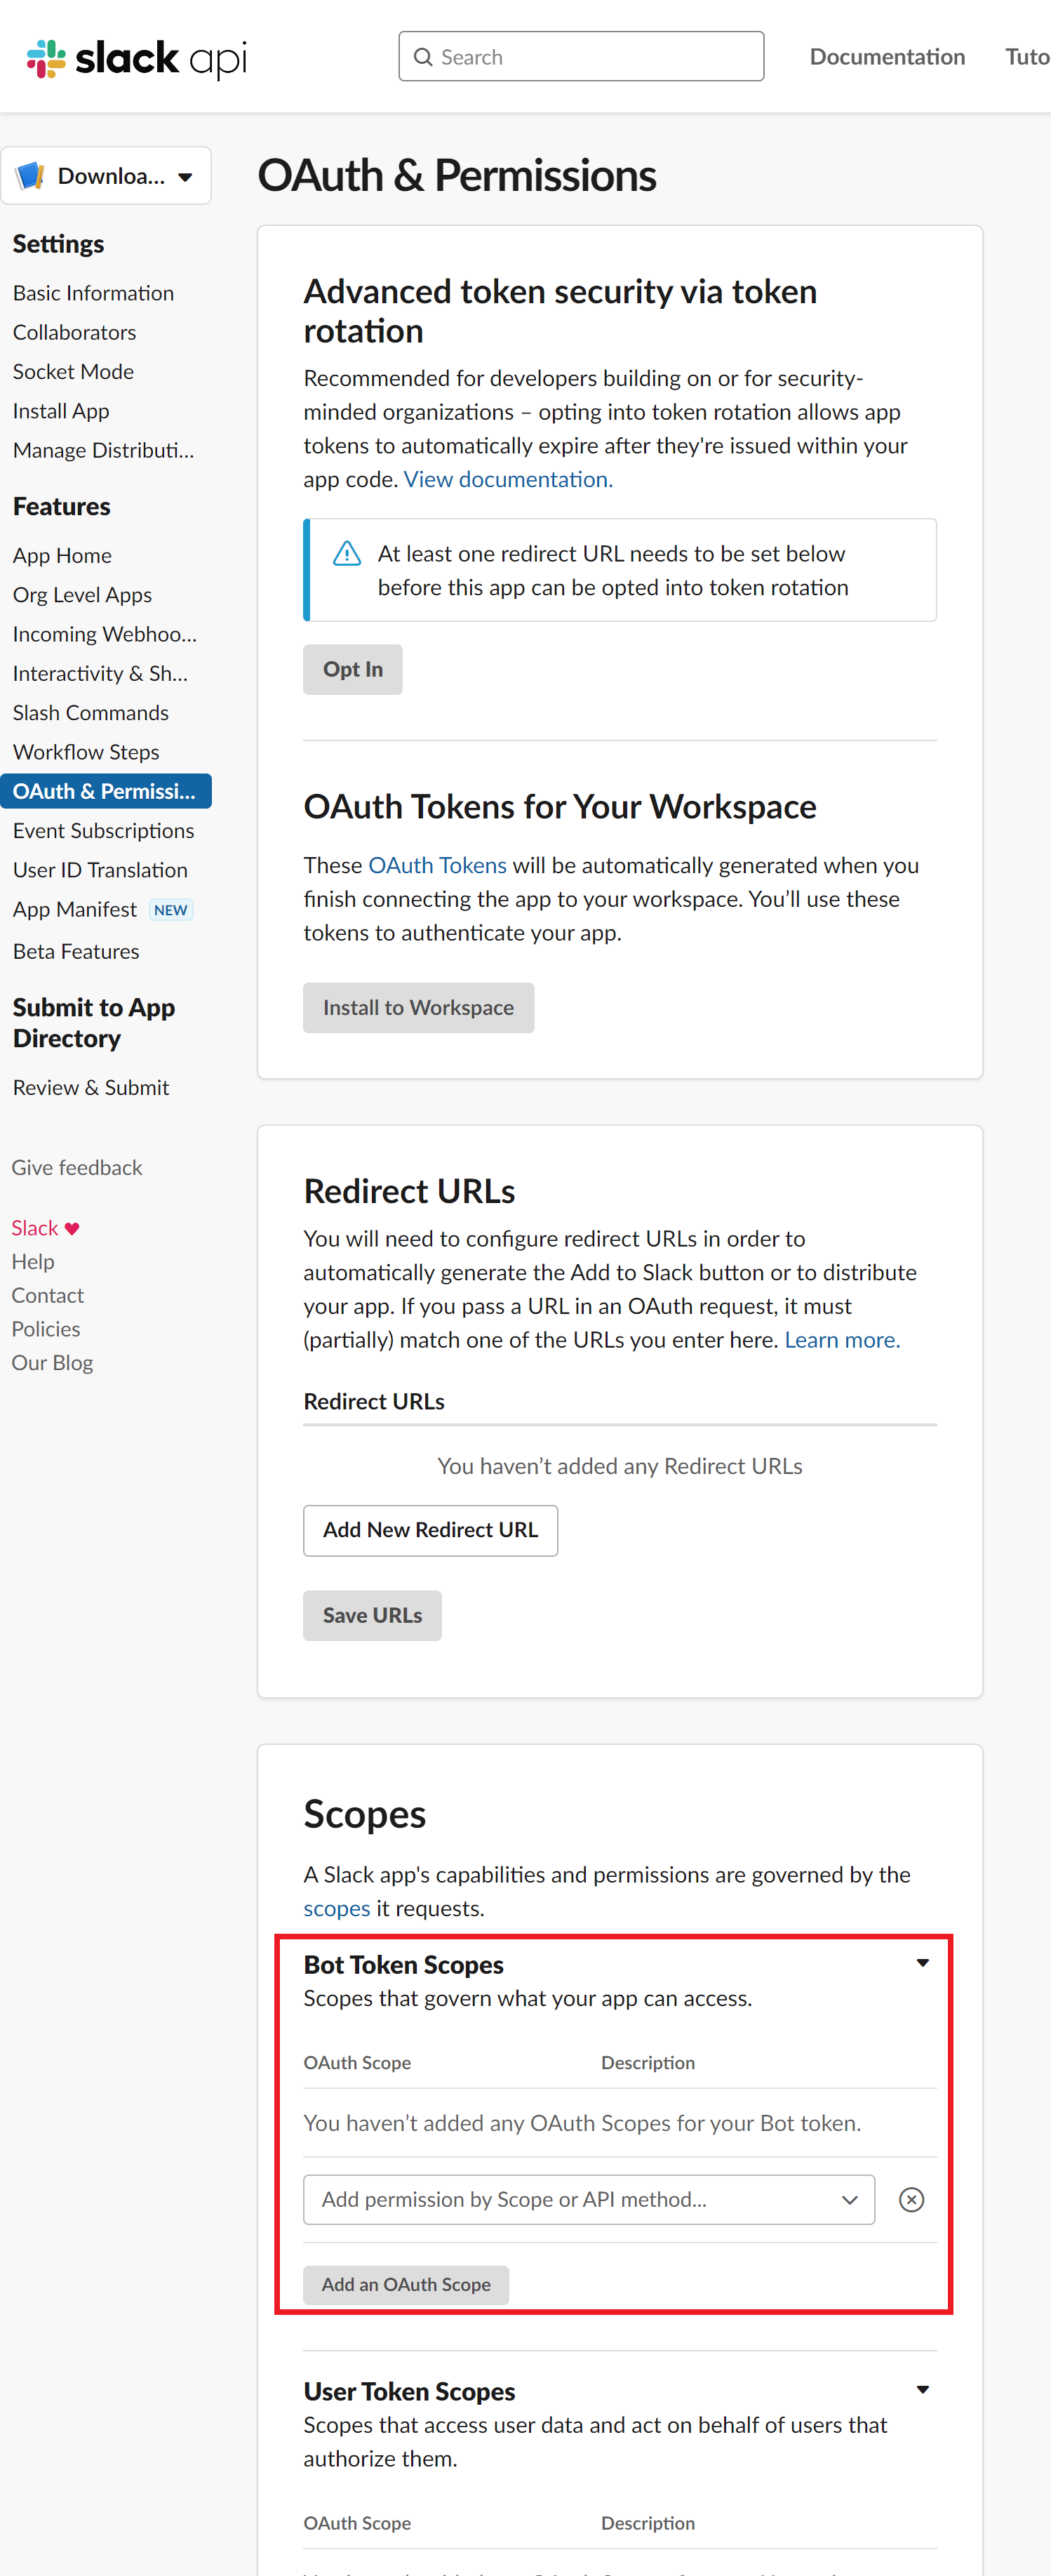
Go down to “Bot Token Scopes”. Them select and add scopes by “Add permission by Scope or API method…” and “Add an OAuth Scope”. Required scopes are listed in Scopes required on the original WS side. When all is complete, click the “Install to Workspace” button at the top.
Click “Install to Workspace”.
Permission is requested; so allow this
When the screen returns, click “OAuth & Permissions”.
“Bot User OAuth Token” is the Token that you want this time. Make sure it starts with “xoxb-“.
Scopes required on the original WS side#
- [Common in Download/Upload operation]
channels:history
channels:join
channels:read
files:read
groups:history
groups:read
- [Only required for downloading operation]
bookmarks:read
emoji:read
users:read
3. Obtaining Slack token (the destination WS)#
Basically, the same operations as in the previous section are performed on the destination WS.
The API name should be easy to understand, such as Uploader API. Also, be careful that this is for the destination WS.
If a manifest file is used to create the file, use the uploader.yml and copy and paste the contents.
Scopes required on the destination WS side is:
- [Common in Download/Upload operation]
channels:history
channels:join
channels:read
files:read
groups:history
groups:read
- [Only required for uploading operation]
channels:manage
files:write
chat:write
chat:write.customize
pins:write
bookmarks:write
reaction:write
4. Add API bot to Private channel on the original WS#
By default, the API cannot read private channels, so it performs the operations equivalent to inviting a user. For public channels, it is possible to join a channel without an invitation, so no action is required.
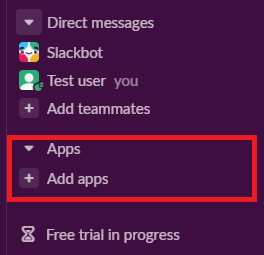
From the left panel of Slack, select “Add Apps”. (If it does not appear, section 2 has failed.)
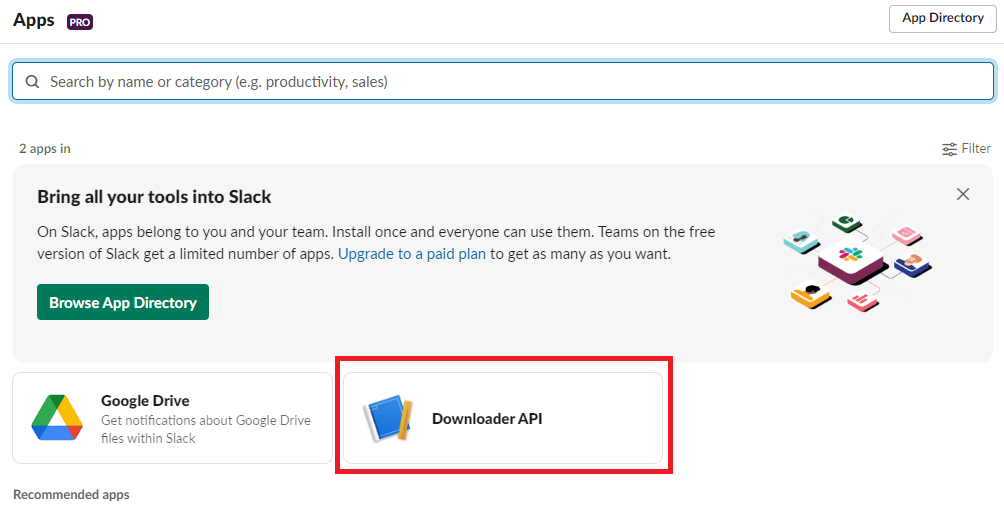
Next, select Downloader API (created in section 2) from the list of applications that appear.
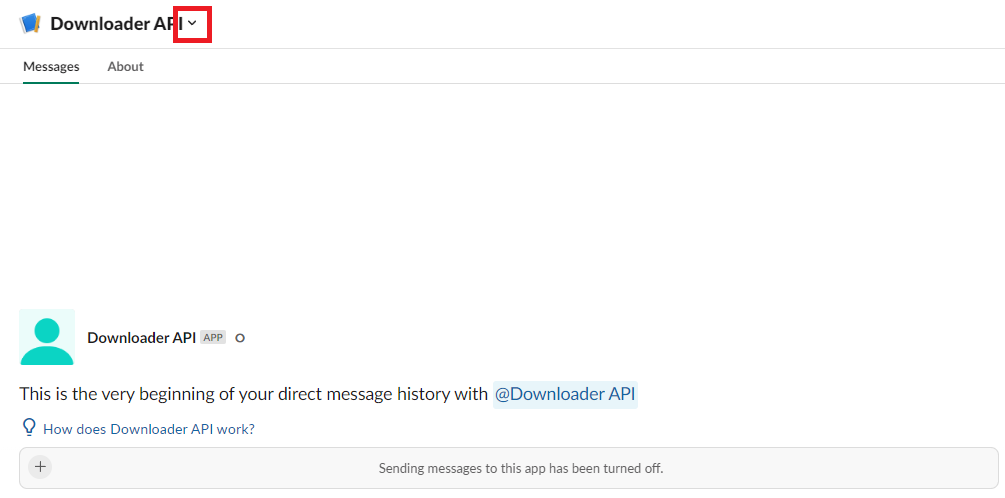
Open the menu by clicking on the arrow right to the user’s name.
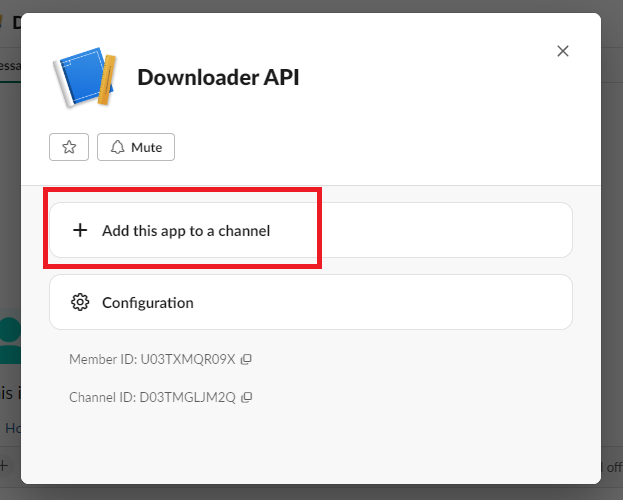
In the menu, select “Add this app to a channel”.
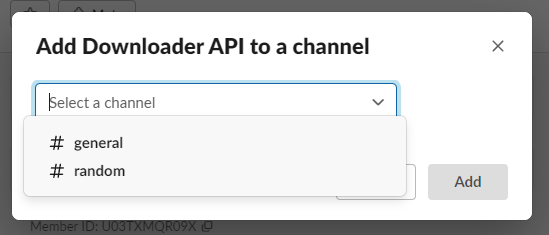
Then, a screen for selecting a channel list will appear, and select the desired private channel. In this example, only Public channel is shown, but you can select any private channel that you are a member of. Public channels can be automatically joined by the API without any special work, so there is no need to add it to them.
5. Considering channel name mappings#
The general channel (or the renamed channel) is treated specially and cannot be changed to private, nor can it be used for Slack connect. Therefore, you should be cautious about putting data into the general (or equivalent) channel of a WS on the destination side.
In general, it is not recommended to transfer data from the general channel of the original WS to the general channel of the destination WS.
- Otherwise, if a duplicate channel name already exists in the uploading WS, there are three options
Add migrated messages to the end of the existing postings –> No additional work is required. (Later, please use
--overrideflag)Create a new channel by removing the existing one → Delete the channel first (if you want to keep it as an archive, rename the channel and then archive it).
Create a new channel as a separate channel → Set the channel mapping. The channel mapping is set by the optional argument described below.
Based on these criteria, determine the mapping between the original channel and the new channel.
6. Migrate emojis#
If you do not migrate the emoji first, you will not be able to move some reactions in the later procedure described below.
If you do not have the original image data, you can use the download tool including in slack_transfer.
When you are using interactive mode (described below in 7-2), you can skip this step because the guidance will appear automatically.
The emoji will be downloaded to the emojis folder in the specified directory.
Upload and add emoji on the destination WS’s administration screen if necessary.
The method for downloading emoji via the CLI is as follows.
First, enter the python environment. For Mac/Linux/WSL:
$ . .venv/bin/activate
For Windows:
$ . .venv\Scripts\activate
Then,
$ slack_transfer emoji --data_dir <local_data_dir> --downloader_token <downloader_token>
- Here, the parameters are as follows.
<local_data_dir>: The directory where the downloaded data will be temporarily stored in the terminal. It can be set as a relative or absolute directory. If it does not exist, it will be created automatically. If you cannot know how to set, please setlocal_data_dir.<downloader_token>: The API token for the original WS, obtained in 2. It starts with xoxb-.
The emojis are stored in the folder <local_data_dir>/emojis. Basically, if you import those file, the name is automatically set the same as the original.
There is a tool for migrating emoji ( https://github.com/smashwilson/slack-emojinator ), but we do not recommend it here because there is no guarantee that it can be done properly, and it uses a unofficial Slack API.
7. Migrate data#
After all preparations are finished, it is time to start the data migration.
- The approximate time required is
Download: 3M/100 seconds + file download time
Upload is in the order of M seconds + file upload time
where M is the number of messages.
Usually, uploading requires a lot of time. This is due the limit of the Slack API, so parallelization using the CLI is not recommended.
If M is large, it is recommended that the following work is performed only when the operation can be kept for a long period of time. This tool also supports individual channel migration using the CLI, so please consider the option as well.
Now, let’s migrate actually.
First, if you are using venv, enter venv.
Mac/Linux/WSL:
$ . .venv/bin/activate
Windows:
$ . .venv\Scripts\activate
- There are two way to operate the following procedures
use the run command to run all settings from the CLI.
use the interactive mode to proceed with all settings on the screen.
Either one can be used, but in rare cases, the second one may not work depending on your terminal environment.
7-1. Use the run command to run all settings from the CLI#
Carry out:
$ slack_transfer run --data_dir=<local_data_dir> --downloader_token=<downloader_token> --uploader_token=<uploader_token> --channel_names=<channel_names> --name_mappings=<name_mappings> [--override] [--skip_bookmarks]
If slack_transfer is not available, you can use python -m slack_transfer.run instead.
- The parameters are as follows.
<local_data_dir>: The directory where the downloaded data will be temporarily stored in the terminal. It can be set as a relative or absolute directory. If it does not exist, it will be created automatically. If you cannot know how to set, please setlocal_data_dir.<downloader_token>: The API token for the original WS, obtained in 2. It starts with xoxb-.<uploader_token>: The API token for the destination WS, obtained in 3. It starts with xoxb-.<channel_names>: The names of the channels to be processed. These are comma-separated names of the channels on the original WS. If you want to target all channels, delete--channel_names=<channel_names>entirely.<name_mappings>: Sets the channel name mappings determined in 4. If you don’t need it, remove<code:`<name_mappings>entirely. It is sufficient to specify only the channel names that need to be mapped. (If you want to use the same name as it is, leave it blank.) For example, it can be set likeold_name1:new_name1,old_name2:new_name2where old_name is the channel name on the original WS and new_name is the channel name on the destination WS--override:If you selected “Add to the end of the previous posts as is” in 4, please add this flag. Remove it if it is not needed.--skip_bookmarks: Remove this flag if the bookmark is also to be migrated.
For other detailed arguments, see slack_transfer.run.run.
Taken together, the example command to be executed looks like:
$ slack_transfer run --data_dir=local_data_dir --downloader_token=xoxb-00000000000-0000000000000-xxxxxxxxxxxxxxxxxxxxxxxx --uploader_token=xoxb-0000000000000-0000000000000-xxxxxxxxxxxxxxxxxxxxxxxx --override --name_mappings=general:_general,random:_random
7-2. Use the interactive mode to proceed with all settings on the screen#
Starts program by:
$ slack_transfer interactive
Then, follow the instructions.